Follow these steps to update your Milo using a USB-C flash drive.
Before you start this process, please make sure you have downloaded the latest Milo software from here.
To update your Milo using a USB flash drive, please follow these three steps:
- Save the Milo software update file on the USB flash drive.
- Plug the USB flash drive into powered on Milo.
- Wait for Milo to upload and update to the latest software.
NOTE: You can only use this process to update a Milo to a newer software version than currently installed.
For more detailed update directions, see below:
STEP 1: PREPARE FOR UPDATE
1. Get a USB-C flash drive- This can be a USB flash drive that has only a USB-C connector or has both a USB-C and USB-A connector, but it needs a USB-C connector to plug into the Milo. You don’t need a large-capacity flash drive; even a 4 or 8 GB drive will work fine.
- We have tested this process with several popular SanDisk USB-C flash drives. Please refer to our list of verified flash drives here: Third party accessories
3. Remove any files or folders from the USB-C flash drive
-
- Transfer any files you want to keep to another location, such as your computer hard drive
- After removing any files you want to save, delete all files and folders/directories from the drive
This step is only needed the first time you use the flash drive, and may not be needed at all, depending on the format of the drive.
-
- On a Windows PC:
- With the USB-C flash drive already inserted, open File Explorer.
- Click on This PC on the left side.
- Under the "Devices and drives" section, right-click the USB drive and select the Format option.
- Depending on your USB-C flash drive size, you can use the "File system" drop-down menu and select the NTFS or FAT32 option.
- Use the default selection in the "Allocation unit size" drop-down menu.
- In the "Volume label" field, confirm a drive name that will appear on File Explorer.
- Under the "Format options" section, select the Quick format option.
- Click the Start button.
- Click the Yes button.
- Click OK on the notification when the process is complete.
- On a Mac:
- With the USB-C flash drive already inserted, launch the Disk Utility from Applications > Utilities
- Select the USB-C flash drive from the list
- Select Erase at the top to open the Erase window
- Provide a name if you want to change it
- In Format, select FAT32
- Click Erase
- Once completed, click Done
- On a Windows PC:
STEP 2: FETCH UPDATE FILE
1. Using the following link, please download the update.shs file onto the USB-C flash drive:
2. Do not change the name of the file - it needs to have the assigned name for the process to work correctly.
If the file saves as "update.shs (1)", you need to edit the file name to remove everything after "shs", including any spaces. If the file is zipped, unzip the file, then delete the Zip file, keeping only the update.shs file.
3. The file update.shs must be at the top (main, or root) level of the USB-C flash drive, not in a folder or directory
4. After the download has completed, safely disconnect the USB-C flash drive from your computer.
STEP 3: UPDATE ALL MILOS
1. Power up your Milos in preparation. Always run with the same Milo software version on all your Milos.
2. Wait for boot-up to complete - you'll hear the “Hello” greeting
3. Insert the USB-C flash drive into the first Milo’s USB-C port (see NOTE below)
4. After a few seconds, the front LED ring will "count up" the installation progress.
* * Do not press any buttons on the Milo during any part of the installation process * *
5. When installation is complete, Milo will reboot itself. You can safely remove the USB-C flash drive immediately after the Welcome sound plays or during the LED pulsing following reboot.
NOTE: If Milo plays a short sound and flashes the LED ring at this point, it means one of several things:
- You’re attempting to install the version that’s already installed
- The USB-C flash drive is not using the correct format
- The update.shs file has a different name, or is in a subdirectory
- Other files are still on the drive
- You used the USB-C drive for a previous update and you're on a Mac (see "Special instructions for Mac users" below)
If this happens, remove the USB-C drive, and resolve as needed
Special instructions for Mac users
Macs leave behind duplicate traces of files even when you think you removed all old versions. That includes files in the Trash directory. If you run into this, follow these steps:
- Connect the USB-C stick to the computer. If you haven't already, copy the new update file onto the USB-C drive.
Note: When you move a file onto a drive, your Mac will create hidden files. You will remove those hidden files next. By fetching the new update file first, you remove the hidden files also for that file, which is what you want.
- Open a Terminal window.
Click the magnifying glass in your Mac toolbar, then start typing terminal

When 'terminal' appears and is highlighted, click Return to open
Open a new terminal window from the drop down menu, or type
COMMAND-N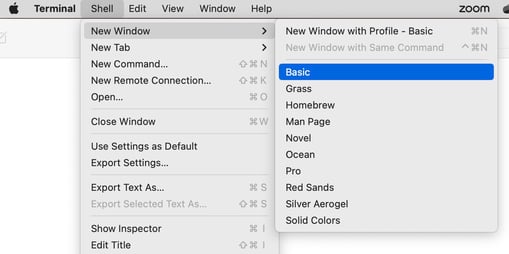
- Change directory to the USB stick.
In the terminal window, type
cd /Volumes/USB_NAME/
--> swap "USB_NAME" for the name of your USB stick.
You can see the name in your Finder window, or type ls /Volumes/ - Find all old update files on the USB-C stick, including any in the Trash.
In the terminal window, type
find .
--> That's "find SPACE PERIOD"You might be surprised - it can be a long list.
-
Delete every older update file on the USB, including any in the Trash. Look for anything ending with .shs - you need to remove all of them even if the name before .shs is different from the new file. Leave only the new one. It will start a single period and a forward-slash, then the name: ./update.shs. Most importantly, remove the file starting with perion-slash-period-underscore:
rm ./._update.shs - After you have deleted all old files, type find . again and scan the list. You should have only one file left. You'll need this one for your update:
./update.shs - When you're done, type
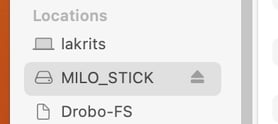
cd
This returns the terminal focus to your hard drive and lets you eject the USB stick from the Finder as usual by tapping the small eject arrow next to the USB-C drive name.
- If you want to learn more about removing files like these from your Mac, search online for "How to delete ._ duplicate files from USB drive" or How to delete dot underscore files from USB drive"